
The making of “gaze upon the stars”
Published on
•22 minute read
Heads up!This blog post may be a bit rough around the edges, as writing long articles like this isn’t exactly my strong suit. If you’ve got some feedback, don’t hesitate to post it in the comments below!
About a month ago I put out on SoundCloud what is likely one of my best songs yet: gaze upon the stars, a cover of Stargazer from the soundtrack of an unreleased indie platformer called Home Paige. I’d highly recommend you check out the original song, because this cover obviously wouldn’t exist without it.
To be more specific, this song is an improved version of a cover I originally published about… 3 months ago already? Man, time sure flies when you’re busy… Anyway, I recently released the accompanying music video on YouTube, and to celebrate I will go over some behind-the-scenes details regarding the cover and its Ableton Live project. But first…
Prelude: What’s a “Home Paige”?
Hey!If you don’t need to know what Home Paige is, you can go ahead and jump to the next section here.
Home Paige is a platformer game created in Unreal Engine, by the indie game studio Minimin. The game is set to take place in a 90s operating system. At the time of writing it’s not out yet, however Minimin hopes to bring out Chapter 1 somewhere in the second half of 20261.
In the meantime, there is a little tech / movement demo that you can try out on Steam. It only natively supports Windows, but it should also run perfectly fine on Linux with the help of Proton. (You never know though, because it’s Linux. We’ve come a long way, but there still is room for improvement.) The final game will have proper Mac and Linux versions1.
(Stargazer is present in this demo; it plays when you reach the end, and can also be listened to in the Playground.)

The Home Paige demo running on Linux, using the Proton compatibility layer. Man, I forgot how dark the Pipes environment is…
Now, what do I like so much about it, as to spend a lot of my time making covers of its soundtrack and such?
-
It’s got a high paced, intricate movement system that is quite fun to play around with, even if my skill issue doesn’t let me make the best use of it. It took me an embarrassingly long amount of time to get that screenshot…
-
The game has a quite playful art style, with graphics that are very much reminiscent of early 3D platformers, while also being semi-modern at the same time (which makes sense, considering it’s an Unreal Engine game). It’s definitely something special.
-
The soundtrack also captures the same playful vibe, making use of instruments ranging from chip sounds to synthesizers to straight up MIDI instruments. That last one’s quite fitting if you consider how prevalent MIDI files were in the time period this game’s taking you back to.
If you want to hear more of this wonderful OST, check out this handy dandy playlist created by Home Paige Discord member Salmo! It includes a bunch of songs that Minimin hasn’t released on YouTube yet, along with some covers and fan songs that are inspired by it.
-
There are a lot of hidden references, such as the Pipes stage looking like the 3D Pipes screensaver from the olden days, and the MIDI sounds I just mentioned. Some even connected parts of the OST with old startup sounds and menu music. Heck, it even has a song called Startup.
All of that gives the game its charm, which resonates with me quite a bit, but that’s just my opinion. Some of you may have mixed feelings towards it, and if that’s how you feel, so be it. If not, then perhaps you should check out the demo linked above.
How I discovered it
This might be a bit peculiar. You see, at the start of December 2025, I was rather bored, and decided to boot up Garry’s Mod. I wanted to get some more playermodels, and when I got a few pages deep, I stumbled into this playermodel of Paige, which, if I’m not mistaken, was made by another Discord member. I thought to myself, “that seems cute, I’ll grab that”.
After playing with that playermodel for a few days, I had grown to like it quite a bit. I remembered the description of that addon mentions a demo, so I figured I would try out that demo. And it should come to no surprise to you that I was quite impressed by it. Which is actually impressive by itself, since I’m not the biggest fan of platformer games (…because I’m just terrible at them).
Fast-forward to today, and now I have a bit of an obsession with this little game. I would’ve even backed their Kickstarter campaign, which is not something I’d usually do, but sadly I missed it by a few weeks. But that doesn’t mean I can’t contribute.
You see, the Home Paige Discord server has a fan art channel. You can find a lot of amazing art there. I’m not that kind of artist though, so instead I opted to post these covers there, because music is also a form of art.
I can assure you that the Discord server members like them a lot, and even Rapwned, the original creator of Stargazer, was a fan of the not-as-good original version:

The comment he left on my original Stargazer cover from 3 months ago. You can see the original comment for yourself right here. And actually, since then, he also reposted both of my latest covers on SoundCloud2.
Alright, it’s time to stop being a Home Paige fanboy for a moment, and actually focus. Let’s talk about what you’re actually here for, which is how I made this cover.
Chapter 1: The Song Itself
In case you’re interested, the original Ableton Live project for this song is available completely for free in my public Nextcloud folder. It contains a lengthy README that should help you get everything you need to explore that project for yourself. The project files themselves are located in the Ableton Projects folder, as stargazer Project.zip.
Hey!The clips below were recorded in Live 12.4. However, the project files will also work in Live 12.3(.6+). You may still want to update, though, as later projects will require it.
If you pay close attention, you can see in the clips that Chorus-Ensemble instances have the Time and Taps parameters introduced in 12.4.
However, if you came here to read this article, chances are you don’t want to bother with all of that. So here we go!
The Chord Progressions
Both the original and this cover are in the key of E Major. My cover is about 77 cents lower in pitch though, which is really closer to E♭, but that’s only because it was slowed down after the fact. More on that in a bit.
Now, for the chord progressions, I ended up treating the bass notes as the root note of each chord, which felt the best to me. That resulted in the following:
For the intro and outro:
| I | – | iii |
|---|---|---|
| E | – | A♭m |
For the remainder of the song:
| I | – | iii | – | vi | – | V |
|---|---|---|---|---|---|---|
| E | – | A♭m | – | D♭m | – | B |
The arpeggios additionally add various flavours of extensions to these chords. I also threw in a sneaky Vsus4 (Bsus4) chord just before the outro, changing to the V (B) chord right after. Typically, that chord sequence would be quite cliché, however it’s pretty subdued here, as some instruments keep barrelling along through these chords uninterrupted.
The Rhythm
The cover’s base tempo is 92 beats per minute, 4 less than the original’s 96. However, the final version was actually slowed down by another 4, resulting in a tempo of 88 bpm. That’s also why the pitch is lower. I go into a bit more detail about this towards the end of the article.
The instruments are generally locked to 8th notes, with an exception being the keys during the intro part. The drums, however, are more interesting; they contain some triplets, but those triplet notes are slightly early, as can be seen in the pattern below.

The first bar of the main drum pattern. Notice how the triplet notes are slightly off the grid.
Of course, having everything else be on the grid isn’t very lo-fi. To loosen it up a bit, there’s a Groove applied to the project, which randomly offsets all the notes just a tad.

The Sounds
Now it’s time to discuss what makes this cover sound the way it does, by going over each of its tracks (in no particular order). There’s quite a bit to go through, so strap in!
Keys
This is likely the very first sound you notice. The tone is produced by Wavetable, and is automated to get brighter as the song progresses, as well as a bit quieter to make room for the melodies. It’s also layered with some microcassette noise from Cymatics, which has some hum to it, that I tuned to match the notes being played.
To top it off, there are some effects like a chorus, Dynamic Tube for some subtle distortion, and Spectral Blur for some unique reverb.
The notes are not quite the same as the original. For instance, during the intro, this instrument is supposed to keep playing a Iadd9 (Eadd9) chord, but that clashed a little too much with the iii (A♭m) chord in this cover. I therefore adjusted those notes to fit in better.
And for the rest of the song, I only discovered the notes were deviating from the original late into making the second version of the cover. Changing them to match just didn’t sit right with me, so I left them. This is my cover, after all. Oh, and of course, the last part before the outro was changed to accommodate the chord switch-up.
For whatever reason, I cannot stop associating this pattern with Super Mario 64’s Dire, Dire Docks, which, coincidentally, I have also made a cover of. But that’s enough self-promotion for today…
Arp
This instrument comes in along with the drums. The original uses a synth here sound that glides a little between every note. In this cover, though, I very quickly ended up with this plucky sound, which I then added many unique things to. Just look at how much is going on here:
See? That was a lot. If you’re not already familiar with Ableton Live or music production, I can imagine you’re having trouble understanding all of that. So, let’s break it down step by step.
-
We immediately start off with something special. There’s an instance of Chord, whose Strum and Velocity parameters are being randomized by Expression Control for each incoming note.
You don’t need to know what that means exactly, only that it randomly sprinkles in some extra notes. The Chance also increases over time, for even more… sprinklage! Is that even a word?
-
The sound is again produced by Wavetable. It becomes brighter and longer over the course of the song.
-
There’s an instance of EQ Eight to filter the arp during the outro. But that’s not very important.
-
Now here’s something juicy:
- We have a Grain Delay modulated by an LFO to create a burst of grains every 2 bars, again automated to get more intense.
- There’s also a Chorus on the other chain to widen the sound some. The grains aren’t affected by it, but now that I think about it, maybe they should’ve been…
-
Finally, there’s a homemade tape delay effect, appropriately named Tape Delay at home:
- The first effect in the chain is iZotope Vinyl, which brings a touch of lo-fi to the delay. Quite literally, in fact, because its Lo-fi option is enabled, adding some sampling artefacts.
- Those artefacts turned out to be a bit too much, though. Thankfully we’ve got TDR Nova
(a dynamic EQ plugin) to tone ’em down.
This actually flew under the radar at first, because the headset I normally use (the HyperX Cloud Alpha’s) didn’t pick them up very well. I did notice them later though, when listening to the song on my phone through my JBL Live 770NC’s. I guess this is what happens when you use headphones that are not designed for music production.
And yes, I know I could’ve just used Redux, which has a dry-wet option, but it’s too late now.
- The actual delay effect is provided by Echo, configured to add some additional noise,
wobble and reverb. Oh, and you bet the delay grows as the song progresses!
Its delay time is also modulated very slightly, although I’m not really sure why I did that.
Alright, now you should hopefully understand how this sound works. Another thing that’s different is the fact that it has a ping-pong delay, as opposed to the original’s simple mono delay. That was definitely the right move. I just love that ping-pong effect.
The final thing I did was resample the sound on a new track, which was then drowned in reverb and faded in right before the actual arp kicks in. I repeated this before the start of the next section as well.
Drum…
I wanted the drums to be a lot more prevalent in this cover. The rather short kick-snare-hat loop that sits in the background of the original Stargazer wasn’t going to cut it for that, so I needed to add some variety.
For starters, I brought in some additional drum sounds: a secondary offbeat snare, an open hi-hat, a ride cymbal, and lastly, a reverse crash. Then, I produced a few extra drum fills (the original only had 2 of them). And of course there’s your fair share of effects, like reverb, saturation and some automated filters.
The drum sounds are a mixture of free Cymatics and stock Ableton samples. I don’t feel qualified to make my own yet, nor do I really want to spend money on samples. (Because why would I do that when I only make free music?)
The… snare, if you want to call it that, also has a little extra click sound that I added by filtering out the high frequencies and adding delay to that. It also swaps ears with every hit. This is incredibly subtle though, so if you can hear it, good job!
Drum Reverb
I want to briefly touch on the reverb for a bit. It’s powered by Hybrid Reverb, which is probably my favourite reverb effect that’s built into Live Suite. You’ll definitely be seeing more of it later.
Hybrid Reverb has a Vintage slider, which adds effects like sampling artefacts and bitcrush, quite appropriate for a lo-fi song. Here that slider is set to the second-highest setting of Older, which makes the bitcrush quite noticeable, especially with the saturation that follows it. Listen closely, and you’ll hear what I mean:
Sorry if the first kick drum is a bit weird sounding. This seems to be an issue with AAC files. It’s also noticeable in some of the other clips here. Not much I can do there.
There is one more setting after this, called Extreme, but as the name implies, it is a bit too… extreme.
…& Bass
I don’t really need to talk too much about the bass sounds here. They both use Wavetable, and sound quite similar to the original song, probably the most similar of any sound in this cover. And that’s simply because they work well. There’s no need to change them too much.
There are just a few things I want to mention. The reese-like bass that plays almost the entire time has a fair bit of subtle randomness going on, especially from the Shimmer unison algorithm. The softer, higher-up fills are also actually a separate sound that uses chorus instead of unison.
And lastly, both sounds make use of a sub oscillator for a bit of extra oomph. Not too much, though, because remember, it is lo-fi. Bass frequencies were rather difficult to produce in the time periods we try to emulate with lo-fi music.
I usually add sidechain to bass sounds to avoid muddying up the mix too much. And while I technically did do that here, the pump effect you’d associate with sidechain doesn’t fit in here very well, so it never ends up reducing the volume by more than about 2 dB.
Strings
This sound is made up of 2 layers. First is actually some real strings from the stock Ableton String Quartet pack, that are played incredibly softly. They’re pretty subtle in the full mix; the intro is probably the part where you notice them the most. Second is yet another Wavetable synth, with a tone that was very mildly inspired by Andrew Huang’s HOLY. (big fan by the way)
You may find this hard to believe (or you may not), but my sound design skills are not quite up to his level. So instead, we’ve got some effects to compensate: a Phaser and a Spectral Resonator. Together they contribute to this sort of “slushy” sound that this second version of the cover ended up with.
One of the notes from the string quartet was much louder than the others for some reason. And that note just so happens to be in 3 of the 4 chords in this song. So I again used TDR Nova to tone it down.
On top of that, you may have noticed one of the lower notes cut out during the third chord. That’s very much intentional; it was done to prevent clashing with the bass slides that would happen there. No one messes with my bass slides.
Choir
Sure enough, it’s more Wavetable. In fact, I’m going to stop mentioning it now, because as it turns out, every single instrument uses Wavetable.
Now, some might not find the choir as good when listening to it in isolation, like below. You can also say this about some of the other instruments. However, what’s more important is that it works in the final mix, and I’d say that’s the case. And it does still help with the song’s slushy sound, especially with those effects.
The High, erm… Thing
Okay, now we’re talking. Or maybe not, because there’s really not much going on here; it’s a surprisingly simple synth sound (try saying that three times fast…) that’s slowly being panned around and is absolutely drenched in reverb.
Remember how I mentioned earlier you’ll be seeing more of Hybrid Reverb? Well, you may have already seen it again with the previous sound, but this is where Hybrid Reverb truly shines with its Shimmer algorithm. It adds a lot to this sound. Don’t believe me? Have a listen to this side-by-side comparison:
One important thing is that the reverb trail is greatly extended when the outro kicks in, which you can see (and hear) in the clip above. It’s still audible when the second chord in the outro hits, and I’m quite fond of that, to be honest.
Plucky Melody
In the first version of the cover, this sound was very similar to the original Stargazer. Not as much in the second version, though. What makes this iteration of the sound distinct is the rather extreme filter LFO that’s on it, which is accentuated further by the feedback-y chorus. That ends up bringing out this song’s… slushiness even more.
The filter and effects in action.
The Final Melody
The song has been building up to this moment. It better sound good.
Well… as it turns out, that wasn’t really the case at first. It used to be on the same octave as the original, and that ended up sounding pretty grating; enough to turn a few people off. And it used to be even worse too, which made someone in the Home Paige Discord server complain about it when I shared the very first early version of the cover.
It was clear to me that this sound needed some changes. So in this new version, it has been dropped down an octave and toned down a bunch, along with a few more tweaks. That was enough to make it sound a whole lot nicer. Sure, there’s always room for further improvement, but that’s where I start running into my sound designing limits.
This is why feedback is important! Again, if you have some feedback on this article, post it on GitHub. Don’t be shy (like me).
The higher octave is actually still there, but it now sits far in the background. The sound itself also features a nice slow vibrato, as well as some subtle bitcrush and sampling artefacts. They’re so subtle you probably didn’t even notice them until now. And then we’ve got the usual chorus, delay and reverb. A lot of those last 2, in fact.
And like the high… thingamajig (man, I really need to come up with a better name for this…), it also ends with a drawn out reverb trail, to accentuate that effect even further.
The Outro
When you make a cover of a song, you have to make it interesting. People are less likely to care if you just end up mostly copying the original. Well, except when your goal is to replicate the original, so you can tell them what makes the song tick. But then it’s not a cover any more, is it?
Obviously, as I’ve just been talking about, a lot of the sounds in this cover are pretty different and unique, while still capturing a similar dreamy vibe. That alone won’t suffice, though. I mentioned before that I changed up the last chord before the outro, and as you may know, the outro itself is different, too.
In the original, it simply goes back to playing the same thing as the intro, in order to get a clean loop. But this cover doesn’t loop like that, which allows me to switch things up by replacing the keys with the arp. Doing that also makes the arp’s special effects stand out more, as they can be pretty subtle when there are drums and other instruments going on at the same time.
Now, that early version I just mentioned actually concludes on the iii (A♭m) chord. That could
maybe work in a way, but now, it instead resolves on the I (E) chord. Then, the tempo
proceeds to get slower and slower, before the instruments cut out and let the echoes do their thing.
And to wrap it up, those echoes (assuming you are still listening closely enough…)
are hit with a tape stop.
Only happy endings for our Paige.
You might say this still isn’t enough, but unfortunately, I’m already starting to push my creativity to its limits here. Coming up with new sections and stuff simply isn’t my cup of tea. I’ll leave that to someone who actually studied music theory. If you want to have a go at it, again, the project files are up for grabs!
Gluing it all together
It’s not lo-fi hip hop if it isn’t lo-fi. And that’s a fact. For this, I grouped all the tracks together and added a side of iZotope Vinyl. You’ll have no doubt noticed it in the last few clips, since it’s the source of the vinyl crackle. There’s also a soft clipper on the master to catch and slightly warm up any volume peaks.
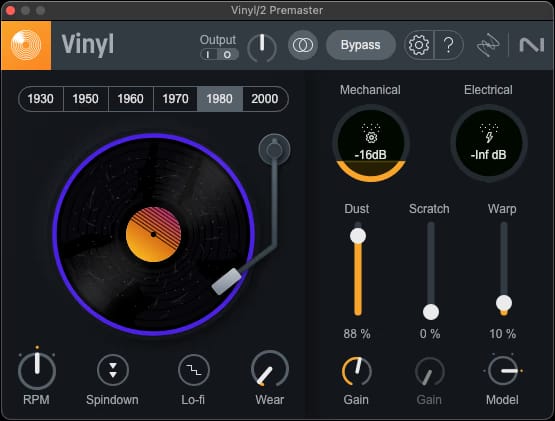
The Vinyl settings for this cover. I also used Spindown at the very end.
Finally, for that last touch of lo-fi, I slowed the final export down by 4.348% in Audacity. That’s why the clips in this blog post sound a bit different compared to the actual cover. Well, that and the many, many layers of randomness.
Why 4.348%, exactly? Well, I actually told you already; that’s because this percentage is what’s needed to bring down the tempo to a nice round number of 88 bpm. You really wouldn’t want to end up with fractional BPM here, because those are a meme.
The Nextcloud folder’s README already goes into more detail about this process, so I won’t cover it again here.
Conclusion
Those were a lot of interesting sounds. Again, perhaps not the best in isolation, but they do come together to form a quite good song, if I do say so myself. And it’s not really that many sounds either, yet the final mix is more than full enough. Of course, all of this wouldn’t be possible without the original Stargazer, so I owe a big thank you to everyone at Minimin!
In case you need a reminder of what the final song sounds like, or you just want to look at it through the newfangled visualizers I added to the website, here you go:
Bear in mind that, like all the other audio clips here, this is a wimpy 128kbps AAC file, so the quality is not the greatest. Consider heading over to that Nextcloud folder to grab a higher quality version, and playing it in the newly added visualizer playground.
I initially wanted this blog post to cover both the song and its music video, however because it was spiralling out of control, I decided to split it up into 2 parts. And after just about 4 months of waiting (wow, what happened…?), that second part is now here!
Hopefully it won’t take another 4 months to release something again. Anyway, see you then!
Footnotes
-
Referenced from Minimin’s post-campaign update on Kickstarter. ↩ ↩2
-
See https://soundcloud.com/f78music/gaze-upon-the-stars/reposts and https://soundcloud.com/f78music/starting-up/reposts. ↩
Comments
Discussion title: Blog post: Stargazer lo-fi cover